
To Make a Salami, Part 2, Build It
Now that we’ve got all our supplies, See Part 1, we build it!
First, we are going to do is wire in the temperature controller to the original thermostat within the refrigerator. This will by pass the original thermostat that controlled when to turn on the compressor. Instead, the new thermostat we install will control it based on what we program the digital controller. This is fairly straight forward and will work for almost every refrigerator out there. Disconnect the old thermostat located at the back of the temperature dial, plug in our thermostat, put new thermostat next to old thermostat. Bada bing. (There is also a second circuit which would allow me to power a heating element of some time, like a light bulb, but I choose, at this time, not to install this. That was a mistake which I’ll go into later.)
Secondly, we wire in the humidity controller to the humidifier and fan, and wire both into the power supply. This one is trickier. The humidity controller is only a switch which will either turn on the humidifier and fan or turn off the humidifier and fan. It does not provide the power to actually run the humidifier. So installing this, along with the humidity sensor, is slightly more difficult.

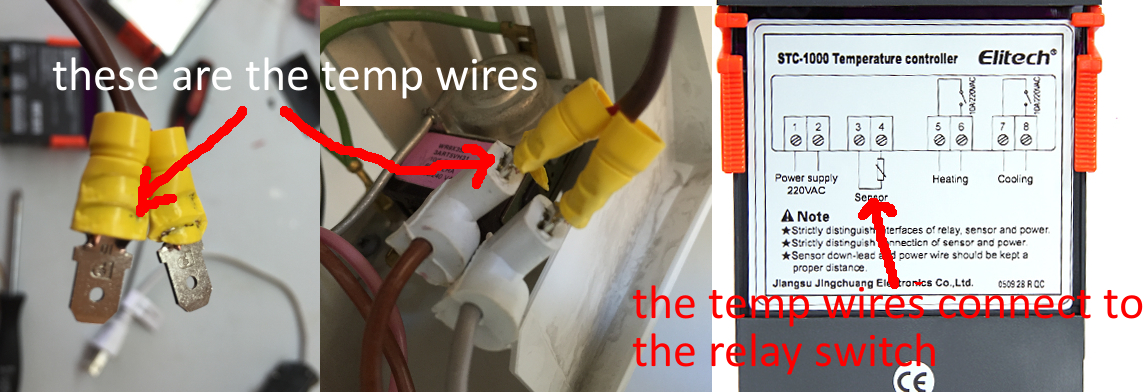 So, let us start with the wiring of the Thermostat. This is pretty straight forward. We are going to wire in the temperature control to replace the leads from the stock temperature controller (the nob with the numbers) and put instead install our own thermometer, the mighty STC-1000.
First thing, unscrew and remove the control panel, pop it off and expose all the wiring and such. Then we find the back of the original thermostat, and the leads into it. Remove these connectors. We then run a new pair of wires into the cabinet through the pass-through port on the back of the refrigerator, and connect them to the controller’s leads. Along with the controller wires, we run in the temp controller’s own thermometer and pack it alongside of the original thermometer. Okay, thermostat done.
Next, the humidity controller. The WH8040 Humidity controller is pretty straight forward. It is a relay switched on by a digital humidity sensor modulated by a thermometer. The sensor wire, the thermometer, and a extension cord to power the humidifier and fan all are run through the back, pass-through. A little bit on the extension cord. It’s a 6 foot two prong cord I bought at the grocery store for $4. I then snipped off the male end, stripped it, and plugged it into the power port of the controller.
Back to the sensors. The thermometer was installed next to the temp controller’s thermometer in the fridge’s control box. The humidity sensor is then bolted to the side of the control box. See the pic.


Speaking of custom controller box, check out the pics! It’s a basic, plastic junction box which I used my jig saw on to cut out the slots for the temp controller and humidity sensor. Then I drilled out a hole in the back for all the wires. Then I put in the controllers and wired them all up.
 Then, there’s the wiring for the controllers. The thermostat control wiring is very straight forward and is covered in the pamphlet that comes with the controller. The
  humidity controller’s wiring is a bit more complicated. The power switch which turns on the humidifier and fan is switched on by the controller. However, the controller does not supply the power to the humidifier or fan. Therefore, in order to power the guts of the cure box, you have to jump the power from the controller’s constant to the switch’s. I have a picture.
When you’ve got all the wires into your junction box and have all the wires hooked up, you can screw it all together and plug in the fridge to test drive it. Just plug it into the wall, turn on both the thermostat and the humidistat, set their initial settings, and… nothing happens…for like 5 minutes until the thermostat does some kind of adjustments, then, bam, it starts humming away. Nice.
Next, we test it out way, way in the future…